Positron and RStudio
You need an environment for writing and running R code. We’re going to focus on Positron, Posit’s newer IDE built on the foundation of VS Code. If you’re already comfortable with RStudio, everything in this chapter applies there too. The fundamental concepts are identical, and the R code in this book works the same way in both.
Why Positron?
Positron represents where computational social science workflows are heading: multi-language support (R and Python in the same environment), modern editor features inherited from VS Code, and a more extensible architecture (i.e., plugins and extension). If you’re coming from VS Code, Positron will feel immediately familiar. If you’re new to both, you’re learning a tool that’s designed for the future of data science.
That said, RStudio remains great. It’s mature, widely documented, and has a loyal community. Some researchers prefer its more opinionated interface. Everything you need is visible and organized for R-first workflows. If you’re already using RStudio and prefer it, nothing in this book requires switching.
The instructions below work in both environments unless otherwise noted. When we say “Positron,” assume the same applies to RStudio.
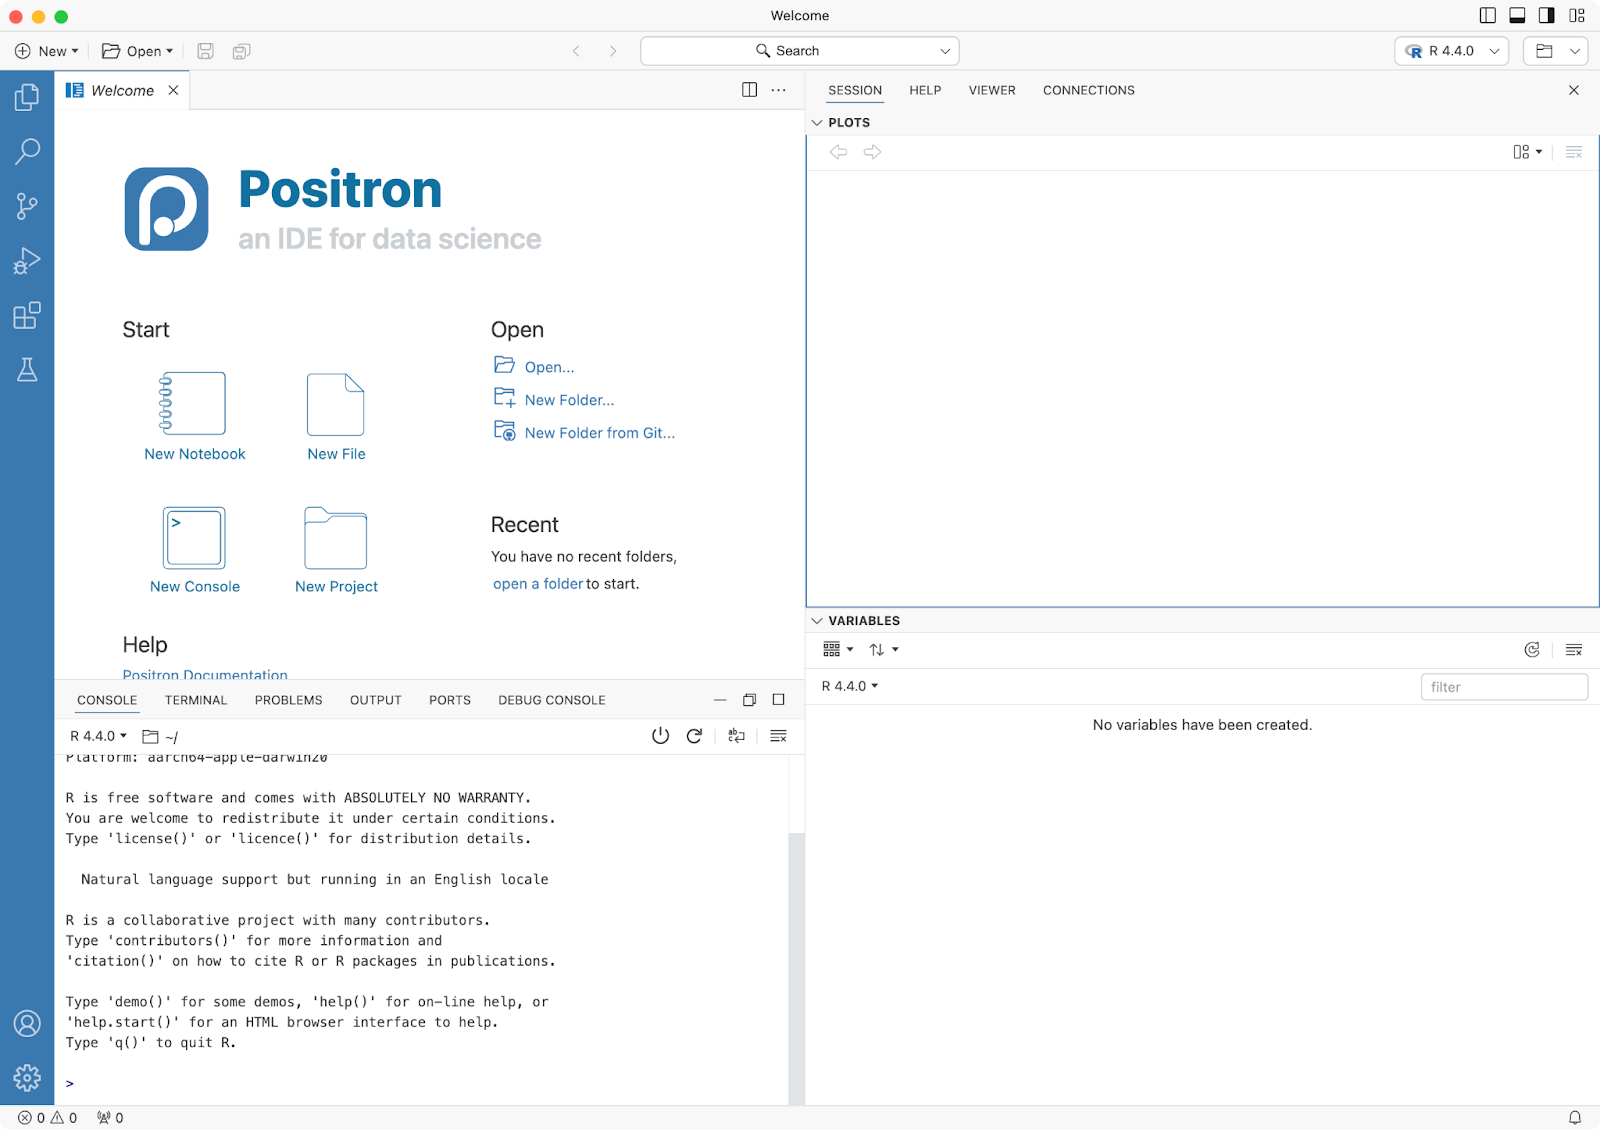
The Four Essential Panes
Both Positron and RStudio organize your workspace into four main areas (though the layout is customizable):
- Source/Editor (top-left): Where you write and edit your code files (.R scripts, .qmd documents)
- Console (bottom-left): Where R actually executes code and shows results in real-time
- Environment/Variables (top-right): Shows the objects (data, functions, etc.) currently loaded in memory
- Files/Plots/Help (bottom-right): Navigate your project files, view visualizations, and access documentation
Understanding Each Pane
Source/Editor Pane: This is where you spend most of your time writing code. The editor provides syntax highlighting (different colors for functions, strings, and comments), autocomplete suggestions, and the ability to work with multiple files in tabs. You can split the pane to view two files side-by-side, and for Quarto documents, you can preview the rendered output alongside your code.
Console Pane: When you run code, it executes here and displays results immediately. Press the up arrow to cycle through previously run commands—useful when you want to re-run or modify something. The prompt > means R is ready for input; a + means R is waiting for you to complete a command (often because you forgot a closing parenthesis). You can clear the console output with Cmd/Ctrl + L, though this doesn’t delete your objects from memory. Note that in the console pane, you have also Terminal. Terminal is different than the console in that the Console runs R code and displays R output, serving as your direct interface with the R language interpreter, while the Terminal provides access to your computer’s system shell (bash on Mac/Linux, Command Prompt/PowerShell on Windows) where you can run system commands like file navigation, git version control, and package installation at the operating system level. In practical terms, you would use the Console for running R scripts, testing R functions, and viewing R output, whereas you would use the Terminal for navigating directories with cd, managing git repositories, installing system dependencies, and running command-line tools. Both are useful, but they serve fundamentally different purposes: the Console speaks R, while the Terminal speaks your operating system’s language.
Environment/Variables Pane: This shows every object currently loaded in R—datasets, variables, functions you’ve created. Click on a dataset name to open it in a spreadsheet-style viewer. The display also shows object types (data frame, list, numeric vector) and basic information like the number of rows and columns. You can remove objects using the broom icon, which clears your workspace—useful when starting fresh.
Files/Plots/Help Pane: The Files tab lets you navigate your project directory, create new folders, and open files. The Plots tab shows your visualizations with forward/back arrows to review previous plots and an Export button to save images. The Help tab displays R documentation when you run commands like ?mean or search for functions. In RStudio, you’ll also see a Packages tab for installing and loading packages; Positron handles packages differently but with similar functionality.
The defaults work fine for now. As you get comfortable, you might adjust panel sizes or move things around, but the essential logic stays the same: code on the left, context on the right.
R Projects
Always work in an R Project. This is the single most important RStudio habit for reproducibility.
An R Project is a folder that contains all files for a particular analysis—data, scripts, outputs—and sets your working directory automatically. This means your code will work on any computer without changing file paths.
To create a new project:
- File → New Project
- Choose “New Directory” or “Existing Directory”
- Name your project (e.g., “my-first-css-analysis”)
- Click “Create Project”
Notice the .Rproj file in your folder? That’s your project file. Double-click it to open Positron or RStudio with the correct working directory already set.
Essential Keyboard Shortcuts
If you’re coming from RStudio and want to keep using familiar shortcuts, install the RStudio Keymap extension in Positron. Open the Extensions panel (View → Extensions), search for “RStudio Keymap,” and click Install. This maps common RStudio shortcuts to their Positron equivalents so you don’t have to retrain your muscle memory.
Keyboard shortcuts can speed up your workflow considerably. You don’t need to memorize them all at once—start with a few that feel natural, and others will follow as you get more comfortable.
| Action | Windows/Linux | macOS |
|---|---|---|
| Run current line or selection | Ctrl + Enter | Cmd + Enter |
| New document | Ctrl + Shift + N | Cmd + Shift + N |
| Save file | Ctrl + S | Cmd + S |
| Find in file | Ctrl + F | Cmd + F |
| Comment/uncomment code | Ctrl + Shift + C | Cmd + Shift + C |
Insert pipe operator (|>) |
Ctrl + Shift + M | Cmd + Shift + M |
Insert assignment operator (<-) |
Alt + - | Option + - |
| Restart R session | Ctrl + Shift + F10 | Cmd + Shift + 0 |
The run command (Ctrl/Cmd + Enter) is the one you’ll use most—it executes the line where your cursor is, or if you’ve selected multiple lines, it runs all of them. The comment shortcut is helpful when testing code: you can quickly comment out a section to see if removing it fixes an error.
Positron and RStudio have slightly different shortcuts for a few operations, particularly around navigating panes and restarting R. To see the full list specific to your environment, go to Help → Keyboard Shortcuts or press Alt/Option + Shift + K.
Extensions and Customization
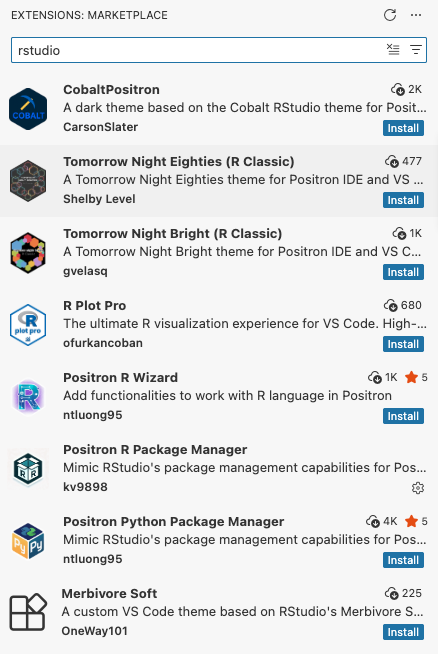
Positron is built on VS Code, which means most VS Code extensions work in Positron. This gives you access to a large ecosystem of tools beyond what’s built into the base IDE.
To access extensions, open the Extensions panel—usually visible in the left sidebar, or accessible via View → Extensions. From there, you can search for extensions by name or browse categories.
Useful Extensions for R Work
While Positron comes with solid R support out of the box, these extensions can enhance your workflow:
- Rainbow CSV: Colors columns in CSV files to make them easier to read
- GitLens: Shows detailed Git information inline (who changed what, when, and why)
- Markdown Preview Enhanced: Better previews for Markdown documents with extended syntax support
To install an extension, search for it by name in the Extensions panel, click on it, and press Install. Most extensions work immediately without restarting Positron.
RStudio’s Approach
RStudio uses “addins” instead of extensions. These are R packages that add functionality to the IDE interface. The ecosystem is smaller than VS Code’s, but focused specifically on R workflows. If you’re using RStudio, you can find addins through the Addins menu once you’ve installed packages that provide them.
Customization
Both Positron and RStudio let you customize themes, font size, and panel arrangements. The defaults work well to start, but if you find yourself squinting at text or want a different color scheme, explore Preferences/Settings → Appearance. Changes are a matter of personal preference rather than workflow improvement, so don’t feel pressure to customize immediately.
What Makes Positron Stand Out
Beyond the basics, Positron offers several features that become valuable as your projects grow in complexity:
Multi-language support: You can work with R and Python in the same project without switching between different environments. If you later need to use Python libraries or call Python code from R (common in machine learning workflows), Positron handles both languages natively.
Terminal integration: The built-in terminal in Positron has better shell support than RStudio’s terminal. This matters when you need to run command-line tools, manage Docker containers, or work with system utilities alongside your R code.
Remote development: Through SSH extensions, you can connect to remote servers and work on them as if they were local. Your code runs on the server, but Positron’s interface stays responsive on your machine. This is useful when analyzing large datasets that don’t fit on your laptop or when you need more computing power.
Performance: The editor itself is noticeably faster with large files—syntax highlighting, scrolling, and searching all feel snappier. This doesn’t matter much for typical scripts, but when you’re working with thousand-line codebases or large Quarto documents, the difference shows.
Modern editor features: IntelliSense provides context-aware code completion (it knows what functions are available on specific objects), bracket matching highlights matching parentheses and braces automatically, and a minimap gives you a bird’s-eye view for navigating long files.
These features are there when you need them. For now, just know they exist—they’re part of why Positron represents where these tools are heading.
Version Control with Git and GitHub
Git is how computational social scientists version, share, and collaborate on their work. GitHub is the most popular platform for hosting Git repositories. If you’ve never used version control before, this section will get you set up with a workflow that integrates directly into your IDE.
Why Git Matters
Without version control, you end up with files like analysis_final.R, analysis_final2.R, analysis_ACTUALLY_final.R. Git tracks every change you make, so you can:
- Go back to any previous version without keeping multiple copies
- Experiment freely—if something breaks, you can always revert
- Collaborate with others without emailing files back and forth
- Share your work publicly for transparency and reproducibility
Most computational social science projects live in Git repositories, and employers expect researchers to be comfortable with basic version control.
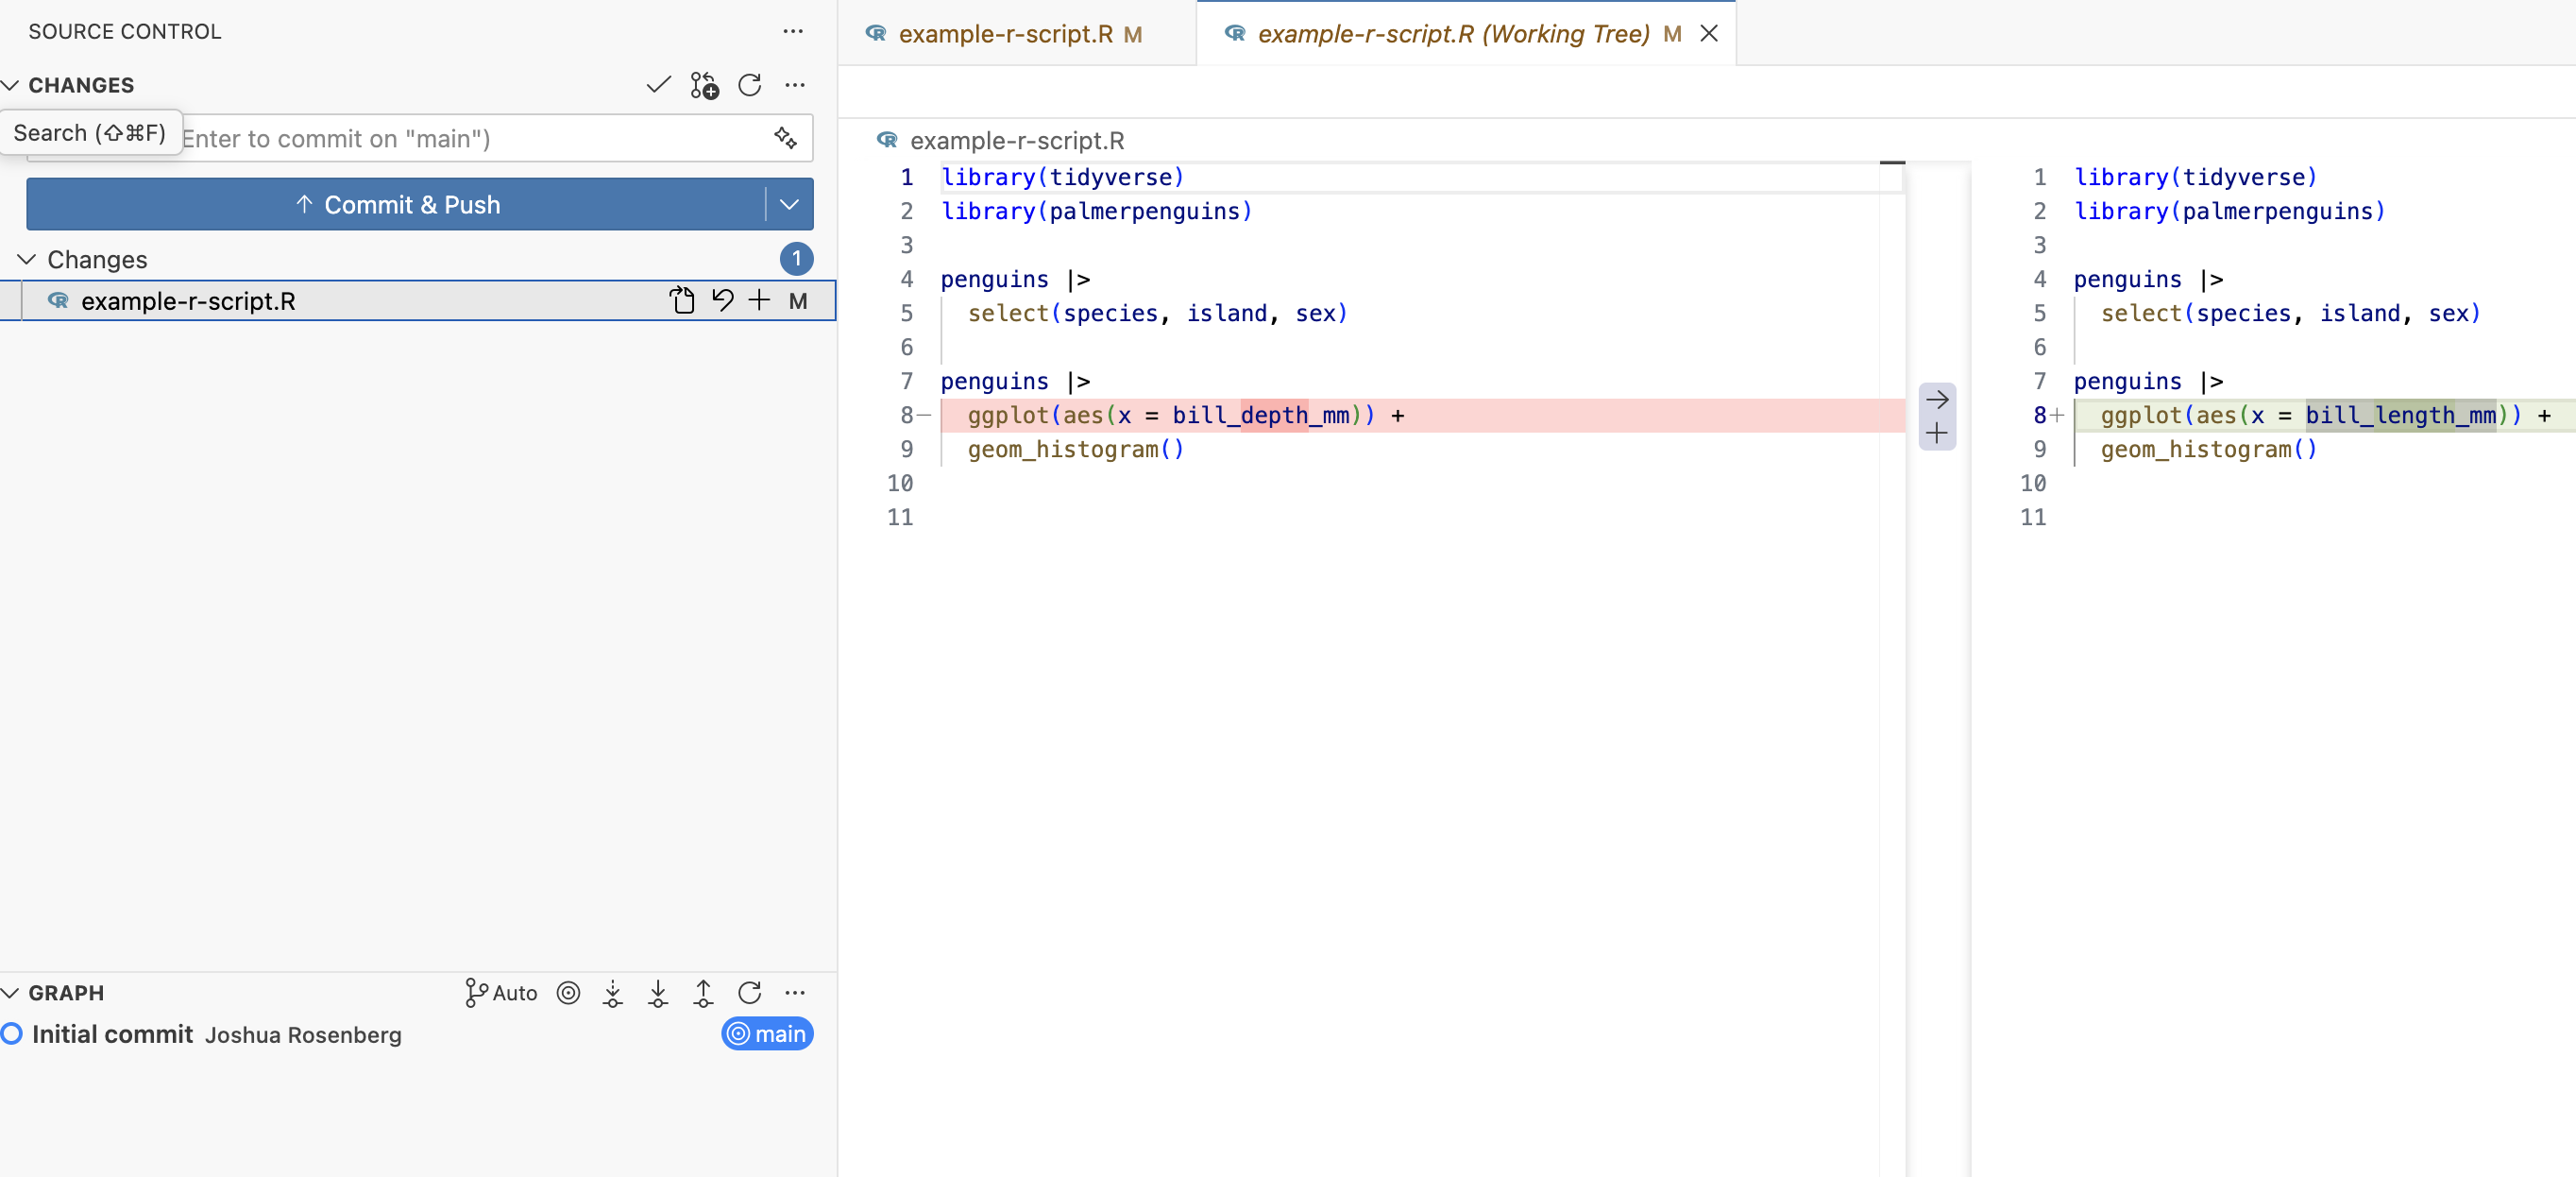
Git Integration
Once Git is configured, you’ll see version control features built into your environment:
- In RStudio: A “Git” tab appears in the Environment pane (top-right)
- In Positron: Git integration works through the Source Control panel (often on the left sidebar)
Either way, you can stage changes, write commit messages, and push to GitHub without leaving your editor. This is far friendlier than memorizing terminal commands.
Setting Up Git and GitHub: The Path of Least Resistance
Git authentication is notoriously confusing. We’re going to use an R-native approach that minimizes pain: Personal Access Tokens (PAT) via the usethis package. This keeps you in familiar territory and works reliably for the kind of work you’ll do in this book.
Step 1: Install Required Packages
install.packages("usethis")
install.packages("gitcreds")
Step 2: Configure Your Git Identity
Tell Git who you are (one-time setup):
usethis::use_git_config(
  user.name = "Jane Doe",           # Your actual name
  user.email = "jane@example.com"   # Email associated with GitHub
)Important: Use the same email address you’ll use (or already use) for your GitHub account.
Step 3: Create a GitHub Personal Access Token
usethis::create_github_token()This opens GitHub in your browser. You’ll need to:
- Log in to GitHub if you haven’t already
- Leave the default scopes checked (at minimum: “repo” and “workflow”)
- Set expiration to 90 days (good security practice, though you’ll regenerate when it expires)
- Click “Generate token” at the bottom
- Copy the token immediately—GitHub only shows it once
The token looks like: ghp_xxxxxxxxxxxxxxxxxxxxxxxxxxxxxxxxxxxx
Step 4: Store Your Token in R
gitcreds::gitcreds_set()When prompted, paste your token and press Enter. R stores it securely for future use.
Step 5: Verify Everything Worked
usethis::git_sitrep()This diagnostic report should show: - Your name and email - “Personal access token for ‘https://github.com’: ‘<discovered>’”
If so, you’re all set. If not, see troubleshooting below.
Alternative: SSH Keys (For the Long Haul)
SSH keys can be convenient—set them up once and never think about authentication again. But they’re more complex to configure initially.
Interested? See Happy Git with R, Chapters 10-12. For now, the PAT method will serve you well.
Using Git in Practice
We’ll introduce Git commands as you need them throughout the book. For now, know that your IDE gives you a graphical interface for the most common operations:
- Pull: Download changes from GitHub (always do this before starting work)
- Commit: Save a snapshot of your changes with a descriptive message
- Push: Upload your commits to GitHub
You can also use terminal commands (git status, git add, git commit, git push) if you prefer, but the IDE interface handles 90% of everyday tasks.
The key habit: commit often with clear messages (“Add data cleaning script” rather than “changes”), and push regularly so your work is backed up and others can see your progress.
A Brief Note on Branches
So far we’ve discussed the basic workflow on a single branch (usually called main). Branches let you create parallel versions of your code for experimentation or collaboration without affecting your main work.
Think of branches as separate workspaces: you can try a new analysis approach on a feature branch, and if it works out, merge it back into main. If it doesn’t work, you can simply delete the branch—your main code remains untouched.
When to use branches:
- Experimenting with new approaches: Try different analytical methods without risking your working code
- Collaborating on specific features: Each person works on their own branch, then merges when ready
- Maintaining different versions: Keep a stable main branch while developing updates separately
Your IDE makes branch management visual. In Positron, the Source Control panel shows your current branch and lets you create, switch, and merge branches through menus. In RStudio, the Git pane has a branch dropdown for the same operations.
For now, working on the main branch is sufficient. We’ll cover branching in more detail when you need it for collaboration or when your projects become more complex.
Going Further
This chapter gave you a working environment. When you’re ready to explore more:
- Positron Documentation: Official docs for Positron features
- RStudio User Guide: Comprehensive guide to all RStudio capabilities
- Happy Git and GitHub for the useR: Everything Git-related for R users
- GitHub Skills: Interactive tutorials for Git and GitHub
Advanced features worth exploring later:
- Code snippets: Type abbreviations that expand to code templates
- Debugger: Step through code line-by-line when things break
- Live Share (Positron/VS Code): Collaborate in real-time by sharing your workspace with others